As this was the first week of class we started off with basic image gathering as most of us have very little actual field experience. As we build off of this week the methods will more than likely get more sophisticated and slightly more complex but using a tried and true method such as the one we used was a safe bet for our first time collecting data. The key topics we focused on were basic but crucial building blocks.
Study Area
Our first area of study was one of which is close to home. For class we made the short journey over to the Eau Claire Sports Center. This location (Figure 1) includes an indoor complex, many soccer fields along with a playground and resting area. The conditions were ideal for the task with virtually no wind, temperatures in the low 70s with the occasional rain sprinkle made for optimal data collection weather.
 |
| Figure 1 - The highlighted area shows where we focused on data collection and gathering images. |
As we were mostly focused on the more general basic methods of collecting aerial images we used a very low tech method - a weather balloon. The original plan was to use a large kite but the unusual occurence of there being virtually no wind made that impossible. Nonetheless, we used a large weather balloon (Figure 2) filled with helium to accomplish our goal. The setup attached to the balloon is known as a picavet rig (Figure 3). A picavet rig is designed for nadir (straight down) images. Fortunately for us one was already setup but we were shown the steps that go in to creating one that works properly and allows for movement as the balloon's movement and orientation fluctuates. The rig was installed after the balloon was inflated and secured with line. The placement of the rig in relation to the balloon is important and it was attached approximately 15 feet below the balloon itself. The picavet rig held two cameras, one of which captured RGB images while the other took infrared images. Also on the rig was a GPS device that recorded the balloons movement in both .kml and .gpx format. The balloon was then released in to the air and we maintained it's height with the line at around 150 ft up. We selected this height because it would allow for clear and concise image overlap. Overlap is significant because without it there wouldn't be a way to accurately overlay images onto each other and create a single fluid image of the area we covered. We achieved overlap by walking in straight lines up and down the highlighted area in (Figure 1) with line spacing of around 30 ft.
 |
| Figure 2 - Weather balloon with picavet rig attached |
 |
| Figure 3 - Diagram showing the basics of a picavet rig |
Results/Discussion
Later in the semester the class will be working on processing images but below are two pictures taken during this activity one from each camera. As I went through the images taken by the cameras I noticed that even without wind the picavet did move around quite a bit. Although the images aren't all perfect we seemed to accomplish a fair amount of overlap and it will be interesting to see how it turns out with the images stitched together.
Later in the semester the class will be working on processing images but below are two pictures taken during this activity one from each camera. As I went through the images taken by the cameras I noticed that even without wind the picavet did move around quite a bit. Although the images aren't all perfect we seemed to accomplish a fair amount of overlap and it will be interesting to see how it turns out with the images stitched together.
 |
| RGB Color Image |
 |
| Near Infrared Image |
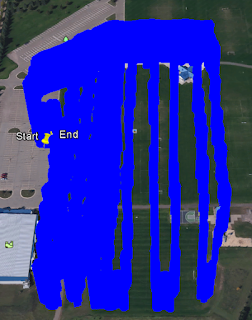
Taking a look at the .kml image (Figure 4) the GPS device recorded was very telling of the path we took while towing the balloon. You can tell by our path we started off doing very tight, close lines for major overlap but as the rain sprinkles picked up and people switched positions towing the balloon our lines got more separated from each other which may be a problem once we get to processing the images.
 |
| Figure 4 - Image captured from Google Earth using our .kml data |
While our weather balloon was in the air we also had a DJI Phantom taking some images of our rig and below is a very brief video showing the rig in action.
Conclusion
This form of aerial image is not only effective but reasonably inexpensive pending you have access to decent cameras and a stash of helium. This method shows you that even with the most basic of materials and resources aerial imaging is not only possible but relatively easy to do without an excessive amount of technology and funds. As this being my first time doing any aerial imaging I was happy with the setup and starting to form a solid basis of knowledge and know how before really diving in to more advance methods to accomplish a similar result. It is crazy to me that not to many years ago the system we used for this activity was really all there was available and was regarded as highly effective and advanced for it's time. Most of today's methods built off of this method and those alike.
No comments:
Post a Comment